7 Javascript Concepts to Master Before Any Framework / Library
A simple guide to essential modern JavaScript

JavaScript libraries/frameworks like React or Vue are ruling the web development world. But to truly appreciate their power, you must have a good understanding and command of certain modern JavaScript concepts.
If you know JavaScript but haven't yet worked with ES6 or any other modern version of JavaScript, then jumping right into something like React might seem terrifying. You might not even recognize it as JavaScript and wonder which new alien language it is.
Relax! You can pick-up these in no time. This article will serve as your simple reference. Don't forget to bookmark it. Also, don't forget to check out the resources section at the end of this article for further reading.
Buckle up… going we’re lightspeed…
1. Understand “let” and “const”
I am sure you might be familiar with var¹, the quintessential keyword to
create variables in JavaScript. We know that in the course of a program some
variables really do not change. They are so-called constants. Technically
though they are all just variables because JavaScript only knows var.
With ES6, a newer version of JavaScript, two different keywords were introduced
let² and const³.
Sure var still works but you are highly encouraged to use let and const.
Let is like the new var, you use it for variable values.
The most important takeaway here is to use
letif you want to create a variable that really is a variable or changes its value. Useconstif you are creating a constant value, like something that you assign once and never change. This is the case more often than you think when you are using modern JS frameworks / libraries.
Let's have a quick look at how they work. During the older var days we would
do something like this
var userName = 'John';
console.log(userName);
Then if we re-assign a new value to username
userName = 'Doe';
console.log(userName);
Let's Run it. You will see John printed first followed by Doe
Now instead of var we use let
let userName = 'John';
console.log(userName);

userName = 'Doe';
console.log(userName);
When you rerun the code, you will see the same output, and nothing changes. So
let works essentially as var. So, what's the big deal?
vardeclarations are globally scoped or function/locally scoped. Whereasletis block-scoped i.e anything within the curly braces{}.Also,varvariables can be re-declared and updated.letvariables can only be updated but not re-declared. Here’s a good article from freecodecamp diving deeper into this difference.
Let's look at const now
const userName = 'John';
console.log(userName);

userName = 'Doe';
console.log(userName);
Now if you try to run it, You will see John printed first, followed by an
error message.
TypeError: Assignment to constant variable.This is because the value of a const can’t be changed through reassignment,
and it can’t be redeclared.
2. Arrow Functions and how to use them
Oh boy. This one gets me most excited. Another construct that you’ll come across
the most is the arrow functions⁴. It’s not just syntactic sugar for declaring
functions but also how this keyword behaves with arrow functions.
A normal JavaScript function looks like this with the function keyword.
function doSomething() {
  // some more logic...
}
Or you’d have used it as a function expression as
var doSomething = function() {
  // Some more logic ...
}
now, this is how an Arrow function looks like. Also, known as Fat arrow functions.
const doSomething = () => {
 // Some more logic...
}
Here we’re storing the function reference into a constant and on the right-hand
side of = is the arrow function’s syntax. A list of arguments go into the
parenthesis (). Here it's none, followed by the => or the arrow, which is
followed by the function body between the curly parenthesis {}.
Arrow function not only has a shorter syntax due to omission of the
functionkeyword, it also provides benefits and clears a lot of confusions we used to have with the dreadedthiskeyword.Understanding how the notorious
thiskeyword works is a nice rabbit hole to fall into. Take a read of these medium articles here⁵ .
Let us see a few examples and variations of arrow functions. First, let's start with a normal function as a reference point
function printUserName(userName) {
   console.log(userName);
}

printUserName('John');
The output is John. The arrow function equivalent will look like this (Of
course you will use let instead of const if you plan to reassign the
function )
const printUserName = (userName)
 {
   console.log(userName);
}

printUserName('John');
You will still see John As the output. Let’s look at a few alternatives to this syntax. If you only receive one (exactly one!) argument, you can use the short cut of omitting the parenthesis, like so
const printUserName = userName
 {
   console.log(userName);
}

printUserName('John');
However, if you have a function that receives no arguments whatsoever, then you will have to use the empty parenthesis like so
const printUserName = ()
 {
   console.log('John');
}

printUserName();
Likewise, for more than one arguments, you have to use the parenthesis
const printUserName = (userName, age)
 {
   console.log(userName, age);
}

printUserName('John', 28);
These are the different variations regarding arguments. There is also a
different alternative regarding the function body. If you have a function that
just returns something like, say a square of a number. We can have a short form
arrow function like this where you omit the curly braces and also the return
keyword.
const squared = number => number ** 2;
console.log(squared(3));
3. Learn Exports⁶ and Imports⁷ for Modular code
Learning how to write modular JavaScript is essential, even if you are not using any Frameworks / Library. The code is split over multiple files for better maintainability and reuse.
The idea behind export and import statements or so-called modules is that
inside of a JavaScript file we can import content from another file. So that the
JavaScript files themselves know their dependencies.
It might look like this
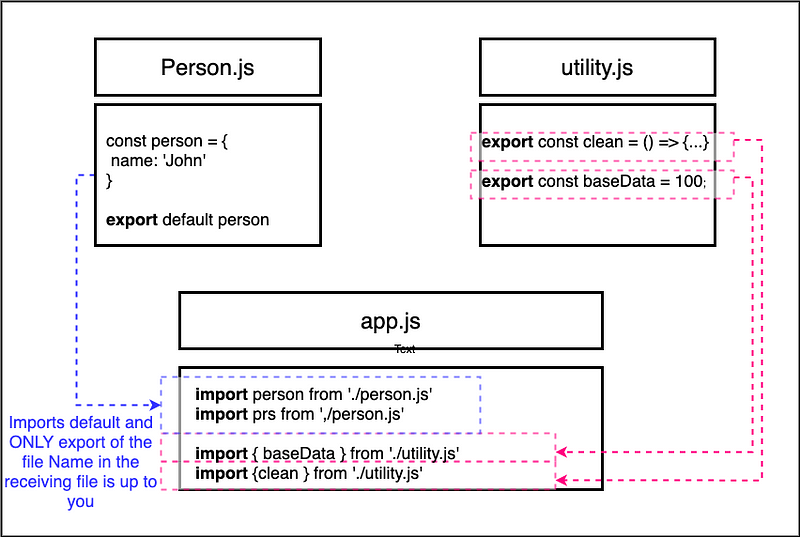 Image created by author
First file person.js we have a constant person which stores a JavaScript
object. we have a default export of this file using the export and default
keywords.
We also have another file utility.js where we export multiple things, a
constant named clean which holds a function and baseData which holds a
number.
We have a third file app.js. We are importing from person.js and
utility.js. which requires a couple of import statements.
We see person.js uses the default keyword. It merely means that if we import
something from that file it will be the default export. In our case, it will be
the person constant. Hence we can name person whatever we want in app.js,
you can see that in the first two statements in app.js we are importing
person.js but with two different names person and prs, the name doesn't
matter.
utility.js is a bit different, we are importing from two different constants
and therefore we use the curly braces {} to explicitly target specific things
from that file. These are called named exports. It is important to provide the
exact names as in utility.js. You can also write this as one statement
import {clean, baseData} from './utility.js'With default export you have the liberty to name it as you will
import person from './person.js'
import prs from './person.js'
With named export you can do this
import {clean} from './utility.js'

//also use an alias
import {clean as cln} from './utility.js'

//or import everything with * with an alias and use it as bundled.clean
import * as bundled from './utility.js'
3. Understand Classes⁸
Classes are from the object-oriented programming world and yes you can use them in JavaScript too.
Think of classes as blueprints/templates for creating objects. They are like the cookie cutter to make cookies, where cookies are the objects. Another example is using stencils to draw shapes, where the stencil is the class and the shapes are objects.
You define a class using the class keyword. A class can have both properties
and methods. A property is a variable attached to the class. Methods are
functions attached to classes. In the following code-snippet person is a
class with name as property and call is a method
class Person {
   name = 'John'
   call = () => {// Some logic...}
}
When you want to create an object using a class, its called instantiating
a class. You use the new⁹ keyword to instantiate a class ( in other words
create an object).
const myPerson = new Person()
myPerson.call()
console.log(myPerson.name)
classes also support inheritance. You can potentially inherit all the properties
and methods from another class and adding new ones to your inherited class. You
use the extends keyword to inherit from classes.
class person extends HumanLet's look at a quick example of class
class Person {
  constructor() {
    this.name = 'John';
    }
   printMyName() {
     console.log(this.name);
}

const person = new Person();
person.printMyName();
The output is John
In the example above, we have defined a class Person. You will notice that
we have used a constructor function. Constructor functions allow you to set
the default characteristics to the object that is created.
Also, you will notice that we have used the this keyword to refer to the
current instance of the class.
Let's look at a quick example of inheritance¹⁰ using the same class
class Human {
  constructor () {
    this.gender = 'male';
    }
    printGender() {
      console.log(this.gender);
    }
}

// Inherit from Human Class
class Person
 Human {
  constructor() {

;
    this.name = 'John';
    }
   printMyName() {
     console.log(this.name);
}

const person = new Person();
person.printMyName();
person.printGender();
Here Person class inherits/extends the Human class. You will notice that even
the Human class has the constructor function. To access the constructor in the
Human class, we have to use the super() function.
You’ll encounter classes more often especially in React for class-based components.
4. Use NextGen Properties and Methods in Classes
The NextGen JavaScript also offers a new syntax for initializing properties and methods.
We already learnt that properties are like variables attached to classes/objects. Methods are like functions attached to properties/objects.
Using ES6 format we have seen constructors used as such in classes
constructor () {
  this.myProperty = 'value'
}
With NextGen JavaScript, we can assign property directly in the class, skipping the constructor function. Behind the scenes, this will still be transformed into a constructor function, but you’ll have an easier time writing this.
myProperty = 'value'It’s pretty similar to methods. In ES6 we would have the methods as
myMethod () {...}The NextGen JavaScript way is to use syntax similar to setting a property. Simply think of a method as a property that stores a function as a value and then we end up with
mymethod = () => {...}One good advantage of this is since we use the arrow function as a property
value we’ve got no problems with the confusing this keyword.
To see this in action, we can modify the example from the previous section as such
class Human {
  gender = 'male';
  printGender = () => {
      console.log(this.gender);
    }
}

// Inherit from Human Class
class Person
 Human {
  this.name = 'John';
   printMyName = () => {
     console.log(this.name);
}

const person = new Person();
person.printMyName();
person.printGender();
5. The helpful Spread¹¹ & Rest¹² Operators
Let's now look at two new operators that will make our life easier as
developers. They are the spread and the rest operator. Interestingly they look
the same … (3 dots). Depending on where you use them, they behave either as
spread or rest operators.
The spread operator is used to split up array elements or object properties. So we “spread up” an array or object.
For example, if we have an old array and we want to add all the elements from the old array to a new array and additionally add a couple of elements this is the syntax we’d use.
const newArray = [...oldArray, 1,2]the … in front of oldArray will simply pull out all the elements and add
them to the new array. The same applies to an object
const newObject = {...oldObject, newProp: 3}Here the … pulls out the oldObject and the values to add them as key-value
pairs of the newObject. As a side note if the old object already had a
newProp, it will be overwritten by newProp with value 3 here.
Now let's look at the Rest operator. It’s the same … operator but used
differently, here it is used to merge a list of function arguments into an
array. Here’s an example
const sortArgs  = (...args) => {
  return args.sort()
}
sortArgs function receives an unlimited amount of arguments, with …, we only
write one argument args. But we may receive more than one argument and they
will all be merged into an array. We can apply array methods to our argument
conveniently.
6. Destructuring¹³
Destructuring allows us to easily extract array elements or object properties and store them in variables.
I know you are thinking, it sounds like the exact thing the spread operator does. Hear me out!
Spread takes out all elements or all properties and distributes them in a new array or object. Destructuring allows us to pull out single elements or properties and store them in variables.
For Arrays, it looks like this
[a,b] = ['Hello','John']
console.log(a) // prints Hello
console.log(b) // prints John
If we have an array with two elements — Hello and John, then we can use the
strange-looking syntax on the left-hand side of the equal sign to assign the
variables a and b to Hello and John respectively
For object destructuring, it’s the same syntax but with the curly braces {}.
{name} = {name:'John', age:28}
console.log(name) // Prints John
console.log(age) // undefined
In array destructuring the order defines which property we take, for object
destructuring its the property name. so {name} on the left-hand side of the
= sign targets the name property on the right side and pulls out the value.
This is why logging age property would yield undefined.
7. Refreshing Primitive¹⁴ and Reference¹⁵ Types
This isn’t a modern JavaScript concept, but it is super important that you understand this right. It can save you from unintentionally sacrificing many nights debugging!
If we create a number like this, this is a primitive type
const number = 5Now if we create a second number num2 and assign it to number, This actually
creates a real new copy of number and assigns the value to num2.
const num2 = number
console.log(num2) // prints 5
numbers, strings booleans are primitive types. When ever you reassign or store in another variable a real copy is created.
If we look at objects and arrays
const person = {
  name = 'John'
}
Now if we create a second object secondPerson and assign person as a value
const secondPerson = person;
console.log(secondPerson); // prints same vale as person
When we log the value of secondPerson, it prints the same value as person.
It will not have copied the person instead, person the object is stored in
memory and the pointer to this memory location is copied to secondPerson.
Now if we change person name property after assigning it to secondPerson,
still, we will see the new value of person logged for secondPerson.
const secondPerson = person;
person.name = 'Doe'
console.log(secondPerson); // prints same value as updated person
This is the same behavior with arrays. This becomes very important as it can lead to unexpected behavior in code. If you copy arrays or objects like this with an intention to create actual copies this won't work!
To create actual copies for reference types we can use the spread operator ….
So our modified code will look like this
const person = {
  name = 'John'
};

const secondPerson = {
  ...person
};
Now seconPerson is an actual copy. Modifying person will not affect
secondPerson.
Conclusion
If you made it this far, Bravo! Thank you for taking the time. Now don't be intimidated by these new syntaxes, this is still JavaScript. The best way to imbibe these is by practice. I encourage you to go back to previous sections and practice, for further reading check out the resources section. Happy hacking!
You might also like:
Resources
The source of truth when it comes to JavaScript is definitely Mozilla Developer Network (MDN).
- MDN reference on
var - MDN reference on
let - MDN reference on
const - MDN reference on arrow functions
- Understanding keyword in javascript
- MDN reference on
exportand default exports - MDN reference on
import - MDN reference on Classes
- Understanding
newKeyword on MDN - Learn more about inheritance in JavaScript on MDN
- MDN reference on Spread Syntax
- MDN rest parameter syntax
- MDN reference on Destructuring
- MDN reference on Primitive types
- Reference types in Javascript